User Manual
1, Add image
The t ext and graphics can be edited by the button “Adding image “ , also can be directly
dragged by the mouse from the atlas to the Editting Window
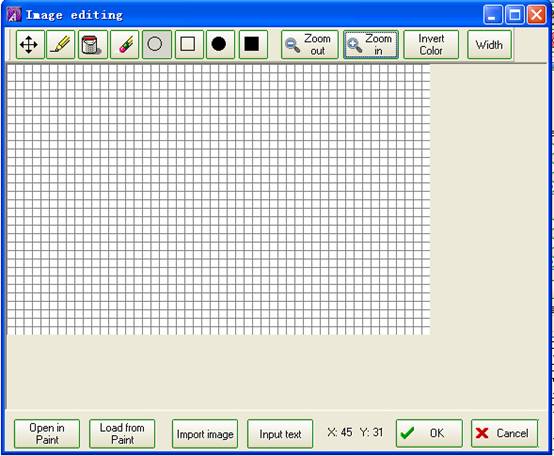
Click " Adding image " to open the following window interface
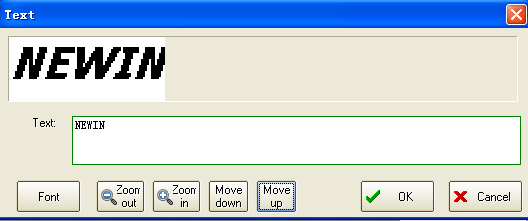
Click " input text “ to shown the below interface, the text can be directly input ,
the font and size can adjusted , and two lines can be avaialable .
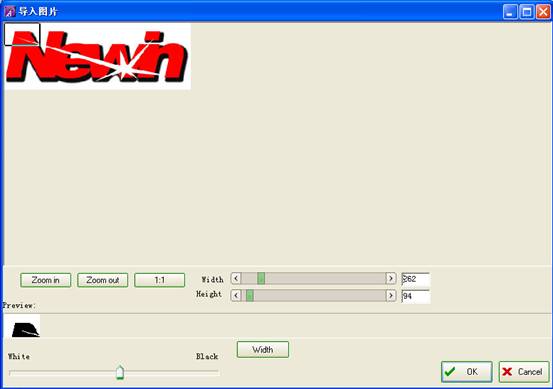
Click "Import image" to display the interface as belows. A editted image can imported
for direct use, and also the part of the imported colorful image can be seleted and
converted to the bitmap images for use, for example a LOGO, etc.
Click "Open in paint" to open the drawing software in the systerm, make a more
advanced features editing and adjustment on the bitmap, and save it . Then click "
Load from paint " to use this image ,finally click "OK" to finish editing, or
click "Cancel" to give up editing.
2, Edit the Image:
The selected image in the window can be re-edit.
3, Delete the Image:
The selected image in the window can be deleted, or click the "X" in the up right
of the image in the window to delete the image.
4, Save the Image:
the selected images is saved as BMP bitmap file
5, Switch on the Indicating light :
Select " Switch on indicator" to switch on and off the background indicating light
(Blue light)
6, Never shut down:
Select "never shutdown" tp cancel the automatic shutdown function in the sensor
which is at the state of being switched off (if this option is not be selected,
the product will be automatically shut down (switched off ) in 2 minutes after
it is key is switched last time when sensor is at the state of being shut down
The sensor's being switched on/off is done by the open and shut, it is through
product long pressing the switch button for 3 seconds continuously
7, LED amount (LED quantity ) :
Please select the corresponding LED quantity on the product and edit correctly
8, Memory:
Please select the corresponding memory size in the product for correct editing.
9, Download data:
After the complete edition, click "Download data" , the product begin downloading
from the computer .
Please do this after installing batteries but getting the product in the state of
being switched off .
10. Note:
1, please make sure the batteries installed in the product first
2, please make sure the battery protective plastic tap pulled out
3. please do downloading after installing batteries but getting the product in the
state of being switched off ..
4, Please make the cable int the right positive pole and negative pole connection .
5, Please make the cable plugs inserted tightly at both ends
6, Please select the corresponding LED quantity on the product and edit correctly
7, Please select the corresponding memory size in the product for correct editing
and pay attention to the remaining space.